Multichannel Inventory Tracking
Inventory tracking is the art and science of monitoring stock levels and exactly where inventory is at any one time. It is therefore one of the most fundamentally critical aspects of overall inventory management.
So this chapter of our guide covers the best practices in tracking inventory. We run through detailed instructions on how to do this via manual spreadsheets (and provide a free template), as well as when to start looking at an automated system.
What is inventory tracking?
Inventory tracking is the recording of stock levels for each individual stock-keeping unit (SKU) across every location items are stored and sold in. This can be done in several different ways - from pen and paper, to computerized spreadsheets, and even automated systems.
Tracking inventory was once a relatively simple task. But it becomes more and more complex as further sales channels and/or warehouses get added to a retail operation.
Failing to track inventory properly can lead to:
Selling inventory you don’t actually have in stock.
Purchasing inventory you don’t actually need.
Filing inaccurate financial records and accounts.
Putting a system in place to track inventory (whether manual or automated) is therefore imperative for ecommerce brands wanting to scale successfully.
Learn more about Veeqo's inventory management software platform
Inventory tracking via spreadsheet
A commonly used inventory tracking option is to record everything via spreadsheet.
This is a form of periodic inventory system. So someone would be responsible for periodically (usually at the end of each business day) updating the spreadsheet with the latest inventory goings in and out (i.e. new sales and purchases).
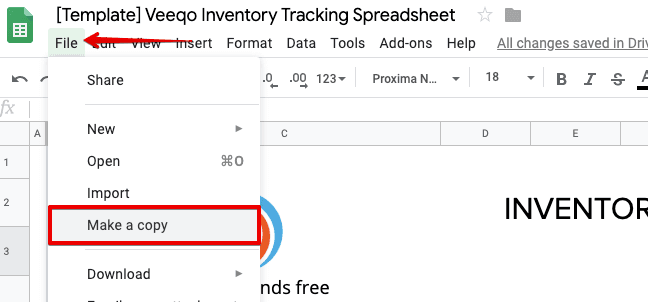
We put together a sample inventory tracking spreadsheet, which you can see here on Google Sheets. Make sure you're signed into Google, then just go to File >> Make a copy to save a version of your own to edit and use:
Setting up your inventory tracking spreadsheet
A basic inventory tracker will cover three pillars:
Product data. Including details like names, variants, SKUs, cost price, selling price and beginning inventory.
Purchase data. To track all purchase orders being made, each causing an addition to inventory levels.
Sales data. To track all sales orders being made, each causing a reduction to inventory levels.
We’ve created three separate tabs in our spreadsheet, one for each of these data pillars:
You’ll need to periodically enter and adjust information in all the tabs for optimal inventory tracking. But the formulas will pull data between tabs, helping to automate the actual tracking process as much as possible.
The ‘Products’ tab
The ‘Products’ tab is where the most up-front work is done. You’ll need to input details about every single product and variant that you have on-hand.
Enter your product details for all the blue columns, and the dark columns will be calculated automatically:
Key tips:
Be consistent with how you format product names, sizes and colors.
Make sure the SKUs match across everywhere this data is used.
Calculate your reorder point for each product scientifically.
Do not edit the black columns, these are calculated automatically from inputted data.
The ‘Purchases’ tab
The ‘Purchases’ tab is simply a running list of purchase orders in order to record and calculate incoming inventory for each product variant.
Enter each variant within a PO as a separate line. Again, just focus on adding data to the blue columns and the dark ones automatically generate:
To keep data consistent, there’s a drop down menu provided that pulls variant information in from the ‘Products’ tab:
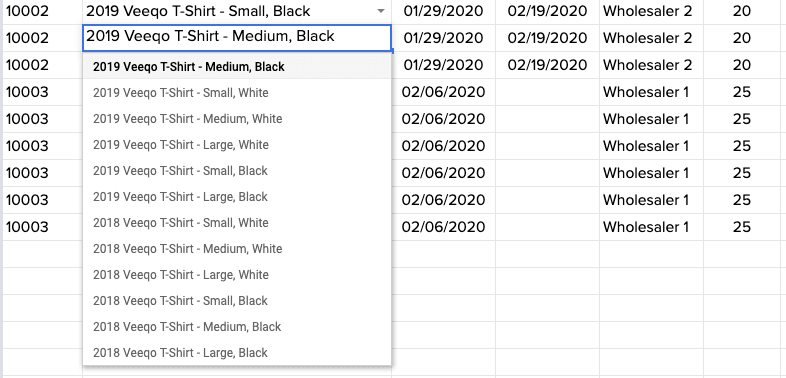
The Delivery Date should also only be added when the product has actually been received and put away ready for sale.
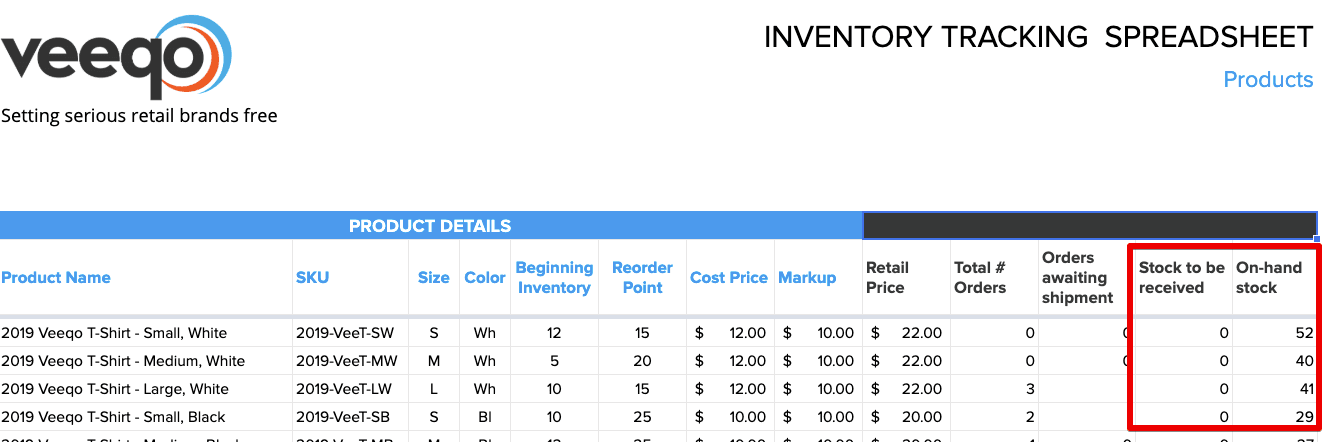
As soon as any delivery date is entered, the ordered amount will add to On-hand stock in the ‘Products’ tab. Leaving delivery date blank will keep it in the Stock to be received column:
Key tips:
Enter each variant within a PO on a separate line.
Leave Delivery Date blank until delivery is confirmed.
Use the product drop down menu to ensure tabs can interchange accurate data.
The ‘Sales’ tab
The ‘Sales’ tab is a running list of sales orders in order to record and calculate outgoing inventory for each product variant.
Just like the ‘Purchases’ tab, enter each variant within an order as a separate line. Once again, enter data to only the blue columns and let the dark ones automatically generate:
You’ll again be able to choose products from a drop down menu. But this time, only enter a Shipped Date once the order has actually shipped.
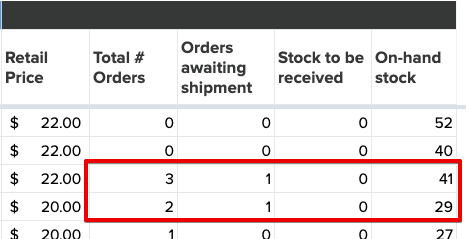
As soon as any shipping date is entered, the quantities will subtract from On-hand stock in the ‘Products’ tab. Leaving shipping date blank will keep the order recorded in the Orders awaiting shipment column:
Key tips:
Enter each variant within a sales order on a separate line.
Leave Shipped Dateblank until shipment is confirmed.
U se the product drop down menu to ensure tabs can interchange accurate data.
Using the inventory tracking spreadsheet
Entering each sales order manually should be avoided if possible. Most ecommerce platforms will allow you to filter orders over a specific timeframe, then export all data to a CSV file.
With Shopify, for example, you simply head to the ‘Orders’ screen and then select the Export button at the top:

You’ll then be able to export all orders from different time ranges directly into a CSV file or Excel spreadsheet:
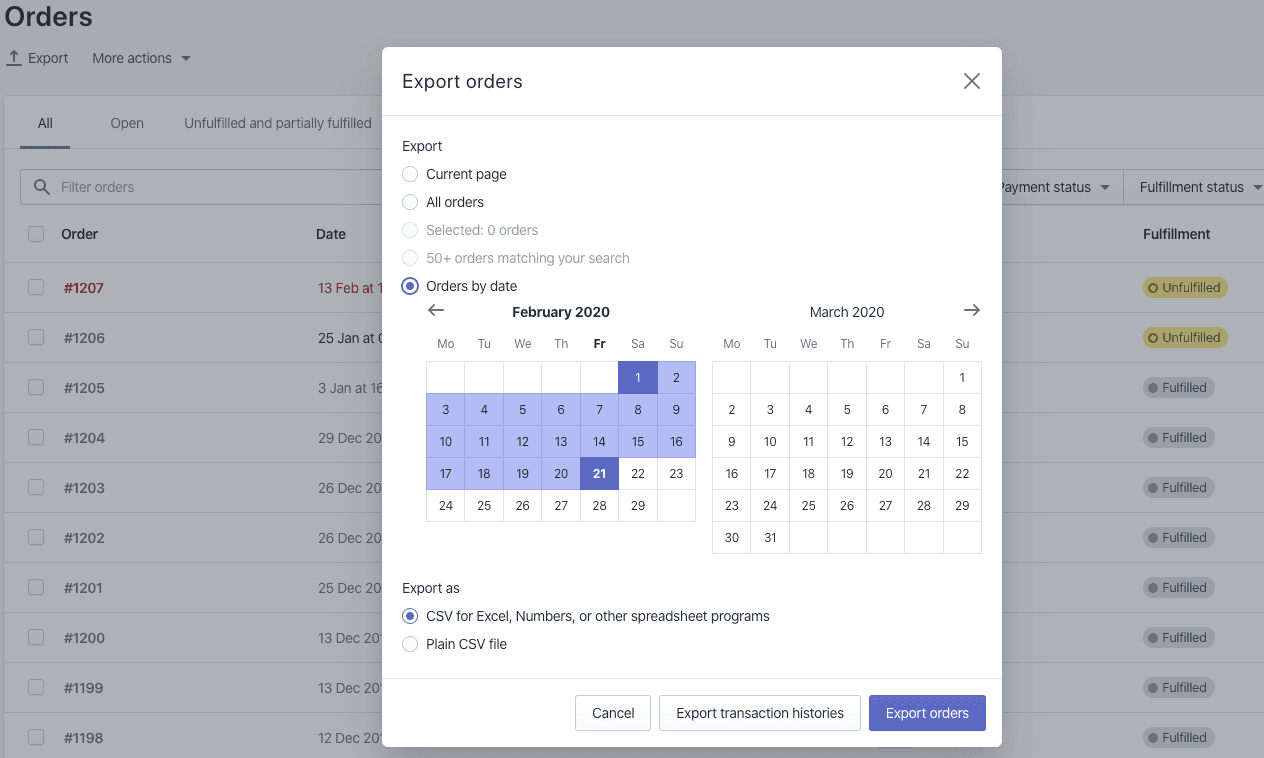
Simply tweak the exported data to fit your inventory tracking spreadsheet, then copy and paste it in. You can repeat this with every sales channel to import sales data as quickly as possible.
Once done, you should have correct inventory data reflected for each variant in your ‘Products’ tab.
As soon as the pre-set Reorder Point is hit for any variant, the On-hand stock figure will turn red:
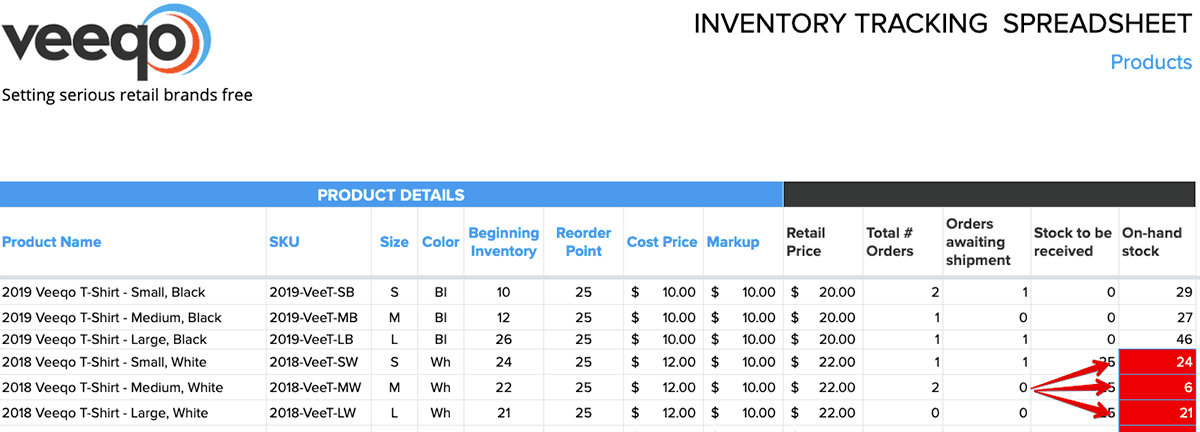
Meaning you can easily see as soon as new inventory needs ordering. And helping to keep the cycle of inventory tracking and management as seamless as possible.
The key thing is to keep the information up-to-date.
This means committing to (at least) daily updates and housekeeping if you choose to utilize this method of inventory tracking. Do this, and you should be able to manage and track multichannel inventory a lot better than with siloed data.
Having said this, sustainable and manageable ecommerce growth will likely need a more automated solution.
Inventory tracking via automated system
An automated inventory tracker effectively does the work of a spreadsheet, but without the manual input needed.
It would connect to all sales channels together, and sync one live inventory figure between them all. Meaning as soon as a sale is made anywhere, inventory levels are updated everywhere else in real-time:

Exact functionality will depend on the specific system being used.
But quality ones, such as Veeqo, will also be able to do things like:
Manage purchase orders to stay on top of incoming inventory.
Sync across multiple warehouses, locations and channels.
Sync data in real-time - not hourly or daily.
Handle orders, shipping and returns in the same platform.
Control exactly how much inventory shows for each sales channel.
Combine products together to sell in kits and bundles.
Choosing an inventory management system can be a big job. And one that either positively or negatively affects your business for years to come.
We talk more about this in the final chapter of this guide.
Automated vs manual inventory tracking
There are pros and cons to both spreadsheet and automated inventory tracking methods. Let’s have a look through a few of the highlights:
Spreadsheet pros
Most of us know how to use and edit a spreadsheet.
Many templates available to help you create your own.
Cheap and cost-effective option for startups.
Can be updated fairly quickly.
Spreadsheet cons
Inputting data and checking accuracy is hugely time-consuming.
Spreadsheets (and your sales channels) won’t be updated automatically as stock levels change, meaning you can easily oversell without realizing.
Different employees may edit and update spreadsheets without making others aware of changes, causing confusion and disrupting the order process.
Automated system pros
Saves time by near-eliminating manual data entry.
Frees up resources that can be re-directed towards company growth.
Brings a consistent, scalable experience for customers across every sales channel.
New sales channels can be easily opened up without adding to workload.
Many systems offer an extensive portfolio of features beyond simple inventory tracking – such as order management, picking and packing, etc.
Automated system cons
Pricing must be factored into your current financial plan.
Staff may require training (though minimal, depending on the system used).
Overall, spreadsheets may be a viable short term solution for startups dealing with low order numbers and a small product catalog. In today’s digital age, however, it’s generally accepted to not be a scalable option for most ecommerce businesses.
An automated system typically requires some level of monetary investment. But it’s one that will prove its worth several times over when it comes to savings in both time and resources.
This chapter should hopefully have given you some clear insights into how to keep track of inventory across your retail operation. Next, we’ll move on to some best practices for inventory accounting. You may also be interested in our guide to inventory reporting systems.


